How to Create a WiFi Hotspot Using the Command Prompt
Now-a-days internet connectivity has become one of the things that we need the most. It would be nice if we can use our computer's fast internet Connection. So guys the solution is Wireless Hosted Network. This concept of Wireless Hosted network was introduced in Windows 7. By using this feature we can easily create a virtual wireless adapter.To do this we only require a CMD(Command Prompt!) with Administrator privileges. And best of all you can connect to another WiFi when Hosted Network is running. This process describes some of the commands that are available only in Windows 7 or Windows 8 Ready PC.
Steps:
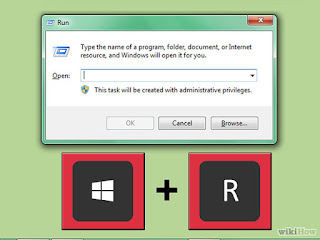
1. Press the "Windows key" and "R" buttons at the same time. The Run window will pop up.
2.Type "cmd" in the box then hit "Enter" or OK. The Command Prompt will pop up, with Administrative Privileges.
3. Type
netsh wlan show drivers in command prompt and press enter.
It will show the output like the image.
In the output
Hosted network supported :Yes means that your computer supports hosted networks. Verify this.
4. Type
netsh wlan set hostednetwork mode=allow ssid=Hotspotname key=password in Command prompt. This will create a Hotspot but it is currently offline.
5.Start. Type
netsh wlan start hostednetwork in command prompt to start the hotspot you just created.
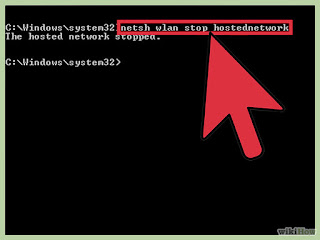
6. Stop. Type
netsh wlan stop hostednetwork in command prompt to stop the hotspot.
7.Details. Type
netsh wlan show hostednetwork to check the hotspot status.
8.Internet. To share your internet connection on this hotspot go to the Network and sharing center and click on Change adapter setting. Here right click on the Connection that you use to connect to internet and select properties. In properties go to Sharing tab and check the box "Allow other network users to connect through this computer's internet connection and select the network connection name that is used by your hotspot.(For this check the Network Connection Window and look for Connection which says Microsoft Hosted Network Virtual Adapter). And save it. Now your inter net connection is shared.
Thank you for reading ....
[image courtesy wiki how]


awsome mr abhijith .... helpful to all internet users ....
ReplyDeletethank you.